Water Leak Solutions
How we do it.
SURFACE PREPARATION
Clean off all loose cement/sand mixtures that may inhibit the adhesion of the waterproofing membrane.
The surface should be dry and free from dust, oil, projections and other contaminants that would interfere with the application of the coatings. Remove all high spots.
All critical right angle bends need to have a strip or coving detail installed. Pre-treat all protrusion pipes and stress points.
Existing shrinkage and non-moving cracks and pipe penetrations shall be patched up and pre-treated with an application of the waterproofing membrane.
RECTIFICATION WORKS FOR WATER LEAKAGE
The main causes of water leakages include natural deterioration of materials, wear and tear over time, poor workmanship at time of construction and improper subsequent renovation works. Water leakage repairs are often expensive and disruptive, the principle is to “do it right the first time”.
Water leakage is likely to occur over time due to deterioration of the integrity of the waterproofing membrane, degradation of pointings at the wall/floor joints and deterioration of concrete infill/grout around pipes.
The application of a waterproofing system requires extreme care, supervision and strict adherence to the manufacturer’s recommended procedures.
Three common methods for water leakage repairs are the liquid waterproofing, re-screeding waterproofing and injection of chemical grout waterproofing.
METHOD 1- LIQUID WATERPROOFING
Liquid waterproofing membrane is in the form of liquid.
Common types of liquid waterproofing used are the Polyurethane liquid membrane, liquid silicone membrane and the liquid glass membrane.
Liquid waterproofing does not need mechanical work during installation. Depending on the type of liquid waterproofing used, it can be applied on with a roller or soak the affected areas to an approximate depth of 3mm. This allow the liquid to slowly penetrate into the cracks of the concrete creating a protective waterproof system.
METHOD 2 – RE-SCREEDING WATERPROOFING
All the floor tiles, screed, pedestal pan and any other fixtures are first removed. Areas around pipes should be hacked slightly deeper (about 25mm or more). Hacked surfaces should be cleaned free of loose particles. Ensure proper prepartion of floor surfaces. The hacked areas around pipes are then filled with a suitable grout.
Good quality waterproofing membrane is applied and left to cure to the manufacturer’s requirements.
A new layer of waterproofing screed is subsequently laid on the waterproof membrane. The pre-packed waterproofing screed is able to produce good bonding strength with low shrinkage. The use of pre-packed waterproofing screed allows better site control of quality and housekeeping.
Flexible cementitious membrane is recommended because it requires much lesser stringent surface preparation. It is able to achieve adequate bonding to the substrate even if the surface is wet and not totally free of dust.
New floor tiles are then laid and the pedestal pan and any other fixtures are re-installed.
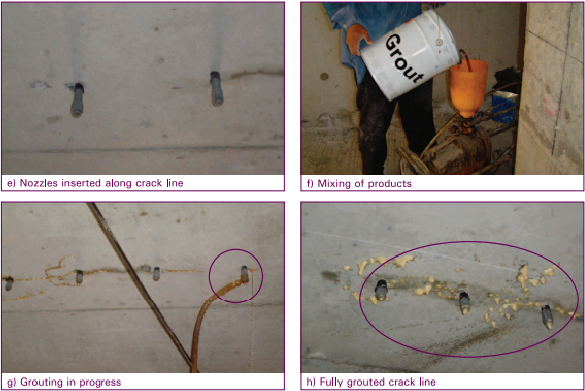
METHOD 3 – INJECTION OF CHEMICAL GROUT WATERPROOFING
This method of rectification has lesser inconvenience to the owners as the repair work does not require hacking of existing surfaces and removing of existing fixtures.
In cases where water leakage is observed, the waterproofing specialist should first locate the crack which is likely the source of the water leaks. Before any rectification work can proceed, the crack and surrounding concrete should be thoroughly cleaned to remove all loose, unsound and deleterious materials. A 45-60 degree angle hole should then be drilled so as to intersect the centre of the crack at a depth of approximately 1/3 thickness of the concrete. The centre to centre distance between the drilled holes will depend on the characteristic of the proprietary product used and site conditions. The crack should be flushed with water prior to grout/resin injection. An injection packer is then inserted into the hole.
If the proprietary product is made up of two components, care should be taken to ensure correct mix ratio of the components. It is a good practice to first test out a small sample amount. The chemical grout/resin is then injected through the nozzle of the injection packer, into the crack line. A suitable pressure pump, at the specified pressure, is required for the chemical grouting. Injection is completed once excess amount of untreated grout/resin is observed to appear from the crack.
Chemical grouts are materials which mix readily with recommended liquid at the time of application. It provides good penetration of wet joints and cracks. Chemical grouts react with water to form a waterproofed solid, stopping the water leaks that is infiltrating the structure. A common chemical grout used is the polyurethane injection grout, which upon contact with water, it expands and forms a tough, flexible foam seal that cannot be penetrated by water.
Upon completion, the injection packer’s nozzle can be removed. The face of the joint and the excess materials should be cleaned.
Write-ups are made with references from BCA and HDB guidelines.